
Introduction: Why Testing Matters More Than Ever in React Development
In today's fast-paced development environment, delivering high-quality React applications requires more than just clean code and beautiful interfaces. As React 19 introduces new patterns and optimizations, implementing a robust testing strategy has become essential for maintaining application reliability and developer confidence.
At ideaflow.studio, we've found that projects with comprehensive test coverage consistently deliver better user experiences, faster iteration cycles, and fewer production incidents. But what makes a testing strategy truly effective in the React 19 ecosystem?
This guide will walk you through building a complete testing pyramid for your React applications—from rapid unit tests to comprehensive end-to-end verification with Playwright. Whether you're new to automated testing or looking to enhance your existing test suite, you'll discover actionable strategies to ensure your React 19 projects stand the test of time.
The Testing Pyramid: Understanding the Foundation of Modern React Testing
Before diving into implementation details, it's essential to understand the testing pyramid concept, which remains relevant even with React 19's improvements:
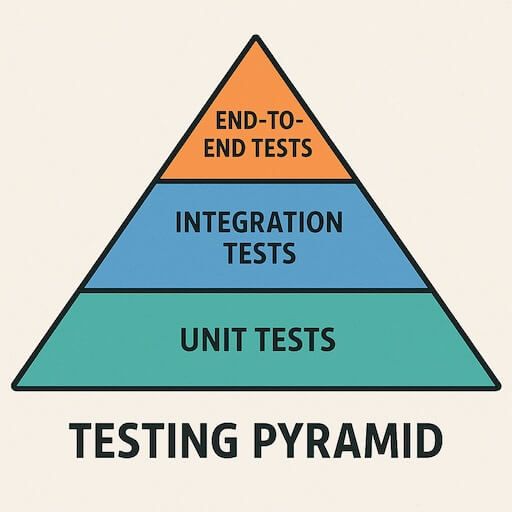
- Unit Tests: Fast, focused tests that verify individual functions, hooks, and components in isolation
- Integration Tests: Mid-level tests that ensure components work together properly
- End-to-End Tests: Comprehensive tests that validate entire user flows from start to finish
Key Insight: While unit tests form the foundation of your testing strategy, end-to-end tests with tools like Playwright provide the highest confidence that your application works correctly from the user's perspective.
The ideal distribution typically follows an 80-15-5 ratio: 80% unit tests, 15% integration tests, and 5% end-to-end tests. This balance ensures thorough coverage while maintaining reasonable test execution times.
What's New in React 19 Testing: Key Changes and Opportunities
React 19 has introduced several key changes that impact testing approaches:
1. Enhanced Server Components Testing
React 19's server components require new testing approaches since they execute on the server rather than in the browser. Testing these components often requires:
- Specialized test utilities designed for server component rendering
- Mocking the server environment appropriately
- Testing the serialized output that will be sent to the client
2. Use Hooks in Testing
React 19 now allows the use of hooks directly in test functions, simplifying many testing scenarios:
jsx
1// Before React 19
2const TestComponent = () => {
3  const result = useMyHook();
4  return <div>{result}</div>;
5};
6
7render(<TestComponent />);
8
9// With React 19
10const { result } = renderHook(() => useMyHook());
11expect(result.current).toBe(expectedValue);
123. Improved Error Handling and Debugging
React 19 provides more detailed error information during testing, making it easier to identify and fix issues. The enhanced error boundaries and improved error messages significantly reduce debugging time.
Setting Up Your React 19 Testing Environment
A well-configured testing environment is crucial for efficient test development. Here's how to set up a comprehensive testing stack for React 19:
Essential Testing Tools
- Jest: The foundation of most React testing setups
- React Testing Library: For component testing that focuses on user behavior
- Playwright: For powerful end-to-end testing
Basic Configuration
Start by installing the necessary dependencies:
bash
# Core testing libraries
npm install --save-dev jest @testing-library/react @testing-library/jest-dom

# For end-to-end testing
npm install --save-dev @playwright/test
Next, configure Jest in your jest.config.js:
javascript
1module.exports = {
2  testEnvironment: 'jsdom',
3  setupFilesAfterEnv: ['<rootDir>/jest.setup.js'],
4  testMatch: ['**/__tests__/**/*.test.[jt]s?(x)'],
5  transform: {
6    '^.+\\.(js|jsx|ts|tsx)$': 'babel-jest',
7  },
8};
9Create a jest.setup.js file to import testing utilities:
javascript
1import '@testing-library/jest-dom';
2For Playwright, initialize the configuration:
bash
npx playwright install
npx playwright init
Unit Testing in React 19: Best Practices and Patterns
Unit tests form the foundation of your testing pyramid. Here's how to approach unit testing in React 19:
Testing Hooks
With React 19's improved hook testing capabilities, you can test hooks more directly:
jsx
1import { renderHook, act } from '@testing-library/react';
2import useCounter from './useCounter';
3
4test('useCounter increases count', () => {
5  const { result } = renderHook(() => useCounter());
6
7  act(() => {
8    result.current.increment();
9  });
10
11  expect(result.current.count).toBe(1);
12});
13Testing Components
React Testing Library remains the gold standard for component testing, aligned with React 19's focus on user behavior:
jsx
1import { render, screen, fireEvent } from '@testing-library/react';
2import Counter from './Counter';
3
4test('counter increments when button is clicked', () => {
5  render(<Counter />);
6
7  const button = screen.getByRole('button', { name: /increment/i });
8  fireEvent.click(button);
9
10  expect(screen.getByText(/count: 1/i)).toBeInTheDocument();
11});
12Testing Server Components
For React 19 server components, you'll need specialized approaches:
jsx
1import { renderToString } from 'react-dom/server';
2import ServerComponent from './ServerComponent';
3
4test('server component renders expected content', async () => {
5  // Set up mocks for data fetching
6  global.fetch = jest.fn().mockResolvedValue({
7    json: jest.fn().mockResolvedValue({ data: 'test data' }),
8  });
9
10  const html = await renderToString(<ServerComponent />);
11
12  expect(html).toContain('test data');
13});
14Integration Testing: Where Components Meet
Integration tests verify that components work together correctly. Here's how to approach integration testing in React 19:
Testing Component Composition
jsx
1import { render, screen } from '@testing-library/react';
2import UserProfile from './UserProfile';
3
4test('user profile displays user information and preferences', () => {
5  const user = {
6    name: 'John Doe',
7    email: 'john@example.com',
8    preferences: { theme: 'dark' }
9  };
10
11  render(<UserProfile user={user} />);
12
13  expect(screen.getByText('John Doe')).toBeInTheDocument();
14  expect(screen.getByText('john@example.com')).toBeInTheDocument();
15  expect(screen.getByText('Dark theme')).toBeInTheDocument();
16});
17Testing Context Providers
React contexts are often used to share state across components. Here's how to test them:
jsx
1import { render, screen, fireEvent } from '@testing-library/react';
2import { ThemeProvider } from './ThemeContext';
3import ThemeToggle from './ThemeToggle';
4import ThemedComponent from './ThemedComponent';
5
6test('theme toggle changes theme for themed components', () => {
7  render(
8    <ThemeProvider>
9      <ThemeToggle />
10      <ThemedComponent />
11    </ThemeProvider>
12  );
13
14  // Initial state - light theme
15  expect(screen.getByTestId('themed-component')).toHaveClass('light-theme');
16
17  // Toggle theme
18  fireEvent.click(screen.getByRole('button', { name: /toggle theme/i }));
19
20  // Verify theme changed
21  expect(screen.getByTestId('themed-component')).toHaveClass('dark-theme');
22});
23End-to-End Testing with Playwright: A Complete Guide
Playwright has emerged as the premier choice for end-to-end testing due to its cross-browser support, reliability, and powerful features.
Getting Started with Playwright
First, create a basic test file in the tests directory (e.g., login.spec.js):
javascript
1import { test, expect } from '@playwright/test';
2
3test('user can log in', async ({ page }) => {
4  // Navigate to login page
5  await page.goto('https://example.com/login');
6
7  // Fill login form
8  await page.fill('input[name="email"]', 'user@example.com');
9  await page.fill('input[name="password"]', 'password123');
10
11  // Submit form
12  await page.click('button[type="submit"]');
13
14  // Verify successful login
15  await expect(page.locator('.welcome-message')).toContainText('Welcome back');
16});
17Advanced Playwright Techniques for React 19
Testing React Routes
javascript
1import { test, expect } from '@playwright/test';
2
3test('navigation works correctly', async ({ page }) => {
4  // Start at home page
5  await page.goto('https://example.com');
6
7  // Click on About link
8  await page.click('a[href="/about"]');
9
10  // Verify URL changed
11  await expect(page).toHaveURL(/.*about/);
12
13  // Verify about page content loaded
14  await expect(page.locator('h1')).toContainText('About Us');
15});
16Testing Forms with Validation
javascript
1import { test, expect } from '@playwright/test';
2
3test('form validation works correctly', async ({ page }) => {
4  await page.goto('https://example.com/register');
5
6  // Try to submit without filling required fields
7  await page.click('button[type="submit"]');
8
9  // Check validation messages
10  await expect(page.locator('.error-message')).toBeVisible();
11
12  // Fill form correctly
13  await page.fill('input[name="name"]', 'Test User');
14  await page.fill('input[name="email"]', 'test@example.com');
15  await page.fill('input[name="password"]', 'SecurePass123');
16
17  // Submit again
18  await page.click('button[type="submit"]');
19
20  // Verify success page
21  await expect(page).toHaveURL(/.*success/);
22});
23Visual Regression Testing
Playwright also excels at visual regression testing:
javascript
1import { test, expect } from '@playwright/test';
2
3test('component renders correctly', async ({ page }) => {
4  await page.goto('https://example.com/component-demo');
5
6  // Take screenshot of specific component
7  const screenshot = await page.locator('.profile-card').screenshot();
8
9  // Compare with baseline
10  expect(screenshot).toMatchSnapshot('profile-card.png');
11});
12Pro Tip: For stable visual regression tests, use Playwright's ability to disable animations and control the environment precisely.
Real-World Testing Strategy: A Case Study
At ideaflow.studio, we recently implemented this testing approach for a client's e-commerce platform built with React 19. The results demonstrate the value of comprehensive testing:
- Before: 2-3 critical bugs per release, 30% developer time spent on bug fixes
- After: 0 critical bugs in the last 5 releases, 15% developer time on bug fixes
- Development Speed: 40% faster feature delivery due to increased confidence
Our testing strategy included:
- 200+ Unit Tests: Covered all utility functions, hooks, and isolated components
- 50 Integration Tests: Verified component interactions and data flow
- 15 Critical E2E Tests: Ensured core user journeys worked flawlessly
The key success factors were:
- Automating test execution in CI/CD pipelines
- Making test writing a required part of feature development
- Using Playwright for critical user journeys
- Implementing visual regression testing for UI components
Common Challenges and Solutions
Challenge 1: Flaky Tests
Solution: Implement retry logic, use Playwright's auto-waiting capabilities, and ensure test isolation.
Challenge 2: Slow Test Execution
Solution: Parallelize test execution, prioritize tests by importance, and implement test sharding.
Challenge 3: Testing External Integrations
Solution: Use mock services for unit/integration tests, but include real API calls in a subset of E2E tests.
Conclusion: Building a Testing Culture
Implementing effective testing in React 19 applications is not just about tools and techniques—it's about building a culture of quality. At ideaflow.studio, we've found that the most successful projects treat testing as a core part of the development process, not an afterthought.
By adopting the strategies outlined in this article—from unit testing with React Testing Library to comprehensive end-to-end testing with Playwright—you can significantly improve your application's reliability, maintainability, and user experience.
Ready to elevate your React 19 applications with professional testing strategies? Our team at ideaflow.studio specializes in building robust, thoroughly tested React applications for clients worldwide.
Contact us today at hello@ideaflow.studio to discuss how we can help ensure your next React project launches with confidence.